思科交换机配置6——生成树协议(STP) 配置好的pkt文件
网络的拓扑结构以及配置参考 《网络设置配置与管理》 吴伯桥主编 书中部分配置命令在模拟器中并不存在,下文中已更改
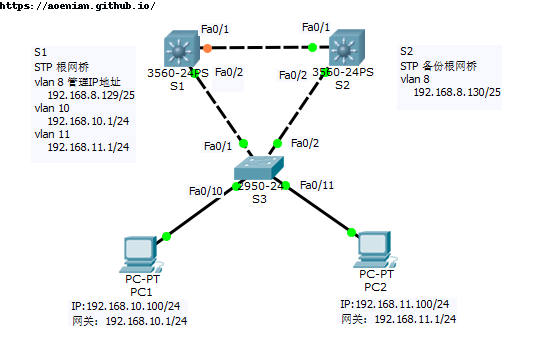
拓扑图:
生成树的理解
生成树配置 因为思科交换机默认启用生成树协议,所以连接后会自行处理环路问题。不过由于默认的根网桥可能不是我们想要的,这个时候就需要进行手动设置。
由拓扑图可知:网络连接后默认S1交换机并不是根网桥,与需求不符。
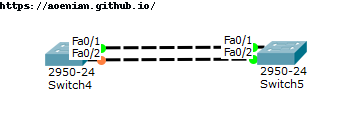
基本的STP命令 拓扑图:
1 2 3 4 5 6 7 8 9 10 11 12 13 14 15 16 17 18 19 20 21 22 23 24 25 26 27 28 29 30 31 32 33 34 35 36 37 38 39 40 41 42 43 44 45 46 47 48 49 50 51 52 53 54 55 56 57 58 59 60 61 62 63 64 65 66 67 S4#show spanning-tree VLAN0001 Spanning tree enabled protocol ieee Root ID Priority 32769 Address 0003.E44 D.6117 Cost 19 Port 1 (FastEthernet0/1 ) Hello Time 2 sec Max Age 20 sec Forward Delay 15 sec Bridge ID Priority 32769 (priority 32768 sys-id-ext 1 ) Address 00E0 .F7B9.E182 Hello Time 2 sec Max Age 20 sec Forward Delay 15 sec Aging Time 20 Interface Role Sts Cost Prio.Nbr Type ---------------- ---- --- --------- -------- -------------------------------- Fa0/2 Altn BLK 19 128.2 P2p Fa0/1 Root FWD 19 128.1 P2p S5#show spanning-tree Interface Role Sts Cost Prio.Nbr Type ---------------- ---- --- --------- -------- -------------------------------- Fa0/2 Desg LRN 19 128.2 P2p S5#configure Configuring from terminal, memory, or network [terminal]? Enter configuration commands, one per line. End with CNTL/Z. S5(config)#interface f0/2 S5(config-if )#spanning-tree vlan 1 port-priority 48 S4#show spanning-tree Interface Role Sts Cost Prio.Nbr Type ---------------- ---- --- --------- -------- -------------------------------- Fa0/2 Root FWD 19 128.2 P2p Fa0/1 Altn BLK 19 128.1 P2p S4#configure S4(config)#spanning-tree vlan 1 root primary S4#show spanning-tree VLAN0001 Spanning tree enabled protocol ieee Root ID Priority 24577 Address 00E0 .F7B9.E182 This bridge is the root Hello Time 2 sec Max Age 20 sec Forward Delay 15 sec Bridge ID Priority 24577 (priority 24576 sys-id-ext 1 ) Address 00E0 .F7B9.E182 Hello Time 2 sec Max Age 20 sec Forward Delay 15 sec Aging Time 20 Interface Role Sts Cost Prio.Nbr Type ---------------- ---- --- --------- -------- -------------------------------- Fa0/2 Desg FWD 19 128.2 P2p Fa0/1 Desg FWD 19 128.1 P2p
上面的配置参考自spanning tree port priority and cost .
详细的配置 VLAN配置 1 2 3 4 5 6 7 8 9 10 11 12 13 14 15 16 Switch>enable Switch# Switch#configure Switch(config)#hostname S1 S1(config)#exit S1#vlan data S1(vlan)#vtp transparent S1(vlan)#vlan 8 S1(vlan)#vlan 10 S1(vlan)#vlan 11 S1(vlan)#exit APPLY completed. Exiting.... S1#show vlan
VTP透明模式设置后
可以参考:VTP的透明模式vtp mode
STP设置 1 2 3 4 S1(config)#spanning-tree vlan 1-4094 priority 0 S2(config)#spanning-tree vlan 1-4094 priority 4096
交换机之间的Trunk链路配置 1 2 3 4 5 6 7 8 9 10 11 12 13 14 15 16 17 18 19 20 21 S1(config)#interface range f0/1-2 S1(config-if -range)#switchport trunk encapsulation dot1q S1(config-if -range)#swi mode trunk S1(config-if -range)#swit trunk allowed vlan all S1#show interface trunk S2(config)#inter range f0/1-2 S2(config-if -range)#swit trunk encapsulation dot1q S2(config-if -range)#swit mode trunk S2(config-if -range)#swi trunk all vlan all S3>enable S3#confi t Enter configuration commands, one per line. End with CNTL/Z. S3(config)#inter r f0/1-2 S3(config-if -range)#swi mode trunk S3(config-if -range)#swi trunk all vlan all
S3的Access接口配置 1 2 3 4 5 6 7 8 9 10 11 12 S3(config)#int f0/10 S3(config-if )#swi mode access S3(config-if )#swi access vlan 10 S3(config-if )#spanning-tree portfast S3(config-if )#exit S3(config)#int f0/11 S3(config-if )#swi mode access S3(config-if )#swi acc vlan 11 S3(config-if )#span por S3#show vlan
PortFast端口
网管地址设置 1 2 3 4 5 6 7 8 9 10 11 12 13 14 15 16 17 18 19 S2(config)#inter vlan 8 S2(config-if )#ip address 192.168.8.130 255.255.255.128 S2(config-if )#no shut S2(config-if )#exit S2(config)#ip default-gateway 192.168.8.129 S2(config)#exit S2#show ip interface brief S3#configure S3(config)#inter vlan 8 S3(config-if )#ip add 192.168.8.131 255.255.255.128 S3(config-if )#no shut S3(config-if )#exit S3(config)#ip default-g 192.168.8.129 S3(config)#exit S3#show ip int b
三层接口配置 1 2 3 4 5 6 7 8 9 10 11 12 13 14 15 16 17 S1#conf S1(config)#ip routing S1(config)#int vlan 8 S1(config-if )#ip add 192.168.8.129 255.255.255.128 S1(config-if )#no shut S1(config-if )#exit S1(config)#int vlan 10 S1(config-if )#ip add 192.168.10.1 255.255.255.0 S1(config-if )#no shut S1(config-if )#exit S1(config)#int vlan 11 S1(config-if )#ip add 192.168.11.1 255.255.255.0 S1(config-if )#no shut S1(config-if )#exit S1(config)#exit S1#show ip int b
测试
PC1和PC2之间可以通信
在PC1上用 ping -t 192.168.11.100 向PC2发包 在PC2上用ping -t 192.168.10.100 向PC1发包 将S3的Fa0/1端口 shutdownno shutdown
拓展阅读